Monday, January 31, 2011

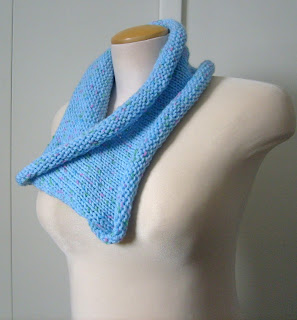
Day 31 and the Shortstop


I call it this because I literally stopped short. This could have easily been a normal scarf that hangs around your neck in the normal way, but because I stopped short, I needed a way to keep this itty bitty length from constantly falling off the neck. The result was a style of keyhole scarf. By folding over the one end and sewing or darning it into place, the end piece is a nice tube of fabric through which the rest of the scarf can be threaded so that it holds onto itself. It even has more functionality for an acrylic since the sewn stitches also prevent some curling.

This was a pattern taken from Stitchionary: Lace so be sure to check that book out if you don't already own it. I added a border because this scarf is made from acrylic and there's no way to block it.
Border:
Right side: Sl 1 Kwise, K2, P2 (pattern) P2, K3
Wrong side: Sl 1 Kwise, K4 (pattern) K5

Finally I did my best to graft it cleanly to the other side. This was tricky because you are grafting front to back , but if you go slowly and follow the movement of the yarn, it can result in a very clean connection.

January's Giveaway Winner!

For this giveaway I typed in each name as many times as each person had entries and clicked create list only once. Below is the result:

Congratulations to Sinead!

You now get to choose from 31 January scarves!

Everyone who participated, THANK YOU!!
Once our winner has chosen a scarf, many of the other completed scarves will be available for a limited time in my etsy shop, NerdyTogether. And perhaps I'll do this again sometime! Time will tell :)

Sunday, January 30, 2011

Day 30 and the College Try


Here is another very very easy crochet scarf. I used a size j hook and a double strand of Simply Soft. Chain as many stitches as you want plus 3 to get the height of the stitch and just do a nice easy double crochet for as long as you'd like. I used a second color and added stripes and switched colors halfway as well.

I suggest using team colors for your college kid to wear with pride. I also suggest picking out colors and making a few of these to match your favorite coats, hats, or gloves. It's just so classic!

Saturday, January 29, 2011

Day 29 and the Reversible Cable

Edit: Ta-Dah!
A picture is coming when the sun gets a little higher

I decided I have far too many feminine scarves and nothing says masculine than a nice neutral colored cable scarf. I'm also a bit fanatical about scarves being pretty on both sides. I can handle it if they aren't but I'm infinitely more happy when they are 100% reversible. Happily, reversible cables are no harder than normal cables and here is one of the most basic types.

In this project I have also found one of my new favorite yarns. This is quite possibly the softest acrylic I have ever felt. I can't even describe it. It feels like baby powder when you rub it on your skin. Loops and Threads Charisma. The brand is actually the house brand of Michael's Craft Stores, and I couldn't be more impressed with the line so far. I hope it stays that way.

Now the basic idea of this type of cable is to work the cabling in 1x1 ribbing and not to block the ribbing out too much. This way it mimics stockinette on both sides. It's important to have a reversible edging or no edging at all to continue the reversibility. Here I've used a seed stitch.

3 balls Charisma
size 13 needles
Extra needle for cabling
Tapestry needle

Gauge is not particularly important here. Aim for about 3 sts/in

Abbrev.
Seed 5: K1, P1, K1, P1
Rib 12: *K1, P1* 6 times
CblRib: Place 6 sts on extra needle and hold in front. From left needle *K1, P1* 3 times. Working off cable needle *K1, P1* 3 times.

Cast on 22 sts.
Rows 1-6: Seed 5, Rib 12, Seed 5
Row 7: Seed 5, CblRib, Seed 5
Row 8-12: Seed 5, Rib 12, Seed 5

Repeat until your scarf is the desired length or until no yarn remains.
Cast off row: Cast off 5 in the normal way. *K2tog, bind off 1* 6 times. Bind off 5 in the normal way. This helps eliminate some of the extra width that is usually forced in with a normal bind off on a normal ribbing. It's not as elastic, but it matches the cast on row better. If you are adept at the sewn ribbing cast off, that would be a perfect substitute.

Tips on working this pattern and technique:
--Use some sort of marker to denote the right side. Because this scarf is completely reversible it can be difficult to tell which side you are on. I like to use the long tail cast on and leave the tail dangling. When the tail is on my right I know I'm on the right side.
--When counting your rows, use the seed stitch as a guide. Place removable markers on the row ends if it helps you keep track of where you are in the pattern.
--Avoid substituting yarns that don't have a lot of stretch such as cotton or bamboo. This cable can certainly be done in those yarns, but a resilient bouncy yarn will have a more even and more handsome result.

If any dear readers who are adept at this technique have tips to add, please let me know in the comments. I'll be happy to edit and give credit for your clever ideas. :)

Friday, January 28, 2011

Day 28 and the Cord Stack


There's an ingenious little device called the Embellish Knit! which is a cranking i-cord maker. If I wanted to make i-cord by hand, I could certainly do it, but for very long lengths it can become mentally exhausting to do something so mindless.

Here I have made lengths of i-cord as long as I wanted my scarf and laying them side by side, sewed straight through all of them in many different places such that the end product was, WOW, a scarf! This would be a terrific project for kids to do since there is no prior skill necessary and using the little machine is very very easy.

I used caron simply soft for all of the cords and this resulted in a thick but soft cord. I did find that the weight that came with the machine needed to be just a little bit heavier for this particular yarn, so I put the weight inside a small tin that I happened to have and added a few other small heavy items like marbles to it. The lip of the tin then held the yarn and I could use the machine in the normal way.

Use extra yarn and a tapestry needle to just sew straight across the grain. I hid my ends, but if you were to let them hang and add fringe on both sides, you would have a completely different and very fun look as well.

Thursday, January 27, 2011

Day 27 and the Keyhole Stripper


Shocking! Not really. In the last few posts I took repurposed fabric and used it as you would any normal fabric. This time I have taken the fabric and turned it into yarn.

This scarf is made of t-shirts which have been cut into inch wide strips and knitted. It does require a bit of extra work since you have to make the yarn as well as knit with it, but because the stitches are so large and a single yard covers a great amount of real estate, you'll be happy to know it won't take nearly as long as you might be guessing right now.

This particular scarf required the lower half of 3 t-shirts. The upper half of the shirts (the part with a neck and armholes) are mere scrap to be reused some other way. Each scrap was cut into inch long strips across the body so that long loops were formed. The loops were snipped so they were just lengths and the ends were knotted together. I used a square knot, but if you know many knots and another would be more attractive, go for it.

I didn't use a pattern and I didn't keep track of my method since this is one of those untidy and meant to be sort of styles. I do know that I cast on 9 stitches using a 35 needle and when it came time for the keyhole, I used knots to tie on the next strand and knots to tie off the ends as well. I did this mostly in Stockinette, but added a garter row here and there to help with some of the curling.

Wednesday, January 26, 2011

Day 26 and the Tidy Scrapper


Maybe insanity isn't for you. I had a couple old sweatshirts that haven't been getting any love in a long long time. They deserve a second chance as a nice scarf. Just like the Scrapper scarf, you can use bits and pieces from any shirts that you happen to have, but this time you will actually be cutting them into nice neat rectangles just like the Double Faced Flannel.

The length of the rectangles doesn't matter as long as the width remains the same. That width should be twice as wide as you want the finished scarf. Cut as many as you need in as many lengths as you please and as many colors as you have. If you have characters or words on some of your scraps, take care to align the images so that when the scarf is worn, the images are right side up. The bottom edge of the image should be closer to an end of the scarf rather than the middle.

Line up the matching widths of the pieces with the right sides facing each other. Sew a seam (anything from a cm to an inch. Whatever you're comfortable with). Open the fold and align another piece of fabric and seam. Keep going until you've used all your pieces.

Now, fold the very long piece of fabric in half long-wise (hot dog style) and line up the long edges. Sew the entire length and turn the item inside out. I used sweatshirts, so ironing wasn't going to do much, but if your fabric is cotton or linen, you might want to give it a light press at this point to tidy up the seam.

Just as you did for the double faced fleece, you'll need to clip the corners, turn in the edges and sew them shut. If you use sweatshirt, you'll want to leave about a centimeter unsewn on each edge. Most home machines just can't feed such a thick fabric and you'll get a nicer seam by stopping short at both ends.

Tuesday, January 25, 2011

Day 25 and the Double Faced Flannel


Bare minimum of sewing is used for this project. If you have a sewing machine, you'll find this goes a lot faster. This is a good project immediately following the Scrapper scarf. That was crazy, but this is very sane.

Cut 2 pieces of flannel the same size and shape. Go for a rectangle if you're new to sewing. Line both pieces up together with wrong sides out and sew around three edges leaving the one short edge open. Clip the corners and turn the whole thing inside out. Clip the corners of the open edge and tuck the open edge to the inside. If you're a perfectionist, sew that last seam by hand with invisible stitches. If you're not as picky, just sew the edge shut with your machine. There will be a slight hem, but if you're careful you can make a very neat finish.

I cheated a bit here and cut one piece of flannel twice as wide as I wanted it and only sewed 2 sides before turning. The end result is the same, but I'm a big old cheater ;)

Monday, January 24, 2011

Day 24 and the Scrapper


PUNK! Emo? I'm not really sure what this could be called, but it's as deconstructed as a t-shirt could possibly get! This is an excellent first project for a beginning sewist with a rocker's spirit. Your rebelling teen would actually be proud to wear this crazed, messy scarf. (Also I wish I too was cool enough to wear it)

Cut up a couple old crummy t-shirts into chunks. They don't have to match and they don't have to be neat cuts. Overlap the edges. Sew the pieces together using some of the weirder utility stitches that are available on your machine. A bunch of different hem stitches are usually on even beginner model sewing machines. If you sew on top of the fabric instead of an edge you get stitches that look like lightning bolts, a heart monitor line, a sawtooth wave. Use thread that completely contrasts the fabric.

When all the pieces are sewn together, embellish by sewing at strange angles through the fabric right over your other stitches. Change the thread color if you're so inclined and sew even more criss-crossing lines. Stick a couple safety pins or kilt pins in that sucker and tack a few band badges all around. Radical.

Scarf Giveaway!

Hello faithful followers! It's been a nearly a month and my daily project has certainly consumed my life. It's beginning to consume all the spare space in my apartment as well, but that is only an indicator of my success so far!

I'm so thrilled in fact to know that I will successfully complete 1/12th of my yearly goal that I would like to celebrate by giving away a scarf. The winner will get to choose one scarf from the January collection to have as his or her very own.

Here's how to enter:

1) Leave a comment with your email address written in this format
Radicalpeep[at]domain[dot]com (it helps prevent spammers)

2) In your comment describe a scarf that you currently that is your favorite and why.

3) Tweet about the contest. Here's the phrase " I entered to win a lovely handmade scarf made by @Nerdytogether! RT to enter! http://ow.ly/3G9I0 "

Do all 3 and you get all 3 entries!

I'll enter all the winners into the list feature of Random.org and whoever comes up in the number one slot will be the winner.

The winner will be announced January 31st at 9 AM.
GOOD LUCK TO ALL! :)

Sunday, January 23, 2011

Day 23 and the Crazy Chain


If you've visited my Etsy shop, you know I'm a big fan of i-cord. I think it's such a versatile technique and it can be made in so many different ways: double pointed needles, single pointed needles, french knitters and spools, specialized machines.

I have so many very short lengths of i-cord left over from other projects, what else was I to do?

This decorative scarf was made simply by connecting each one of those little cords into a complete circle and making a continuous chain. If you don't know how to make a nice neat join, I suggest watching Lucy Neatby's Knitting Gems 1 DVD. It's not precisely the method I like using, but it is a very good tutorial nonetheless.

You may argue that this is more like jewelry than scarfery. I can certainly see your point, but worn doubled, this piece makes a comfortable cowl that does in fact offer some warmth so I judge that it fits within the guidelines of scarfhood.

Saturday, January 22, 2011

Day 22 and the Cord Braid


If you aren't adept at knitting, you can still knit. There's a funky little tool called a spool or a french knitter. It's often a cute little guy and vintage and antique ones are quite collectible. Click here for a glace at a real cutie.

It's a very easy technique and it's often the way young children first begin knitting.

This scarf requires 7 cords and each of the cords must be at least 7 feet long for the end scarf to be a decent length. Hold all 7 cords together and with a spare piece of yarn wrap them tightly together about 2o times. Tie a small knot and hid the knot inside the wrapped yarn.

Braid them together. If you haven't made a 7 strand braid, just think of it like regular weaving. Over under over under over etc. When you've run out of cord wrap the ends just like at the beginning. If your ends are uneven, unravel your cord until it's the right length and tie it off again. Hide the threads down the centers of the cords.

Friday, January 21, 2011

Day 21 and the Novelty Scarf


You knew it was coming. Eventually every yarnhead gives it a try. If you're a beginning knitter the fuzzy novelty yarns that are available in every craft store can give a very big and very fabulous bang for your stitch. If you're an experienced knitter, you can use this scarf recipe to make a gift in under an hour.

2 balls Lion Brand Fancy Fur
120 yrds worsted weight smooth yarn
Size 19 needles
Tapestry needle or crochet hook for weaving ends

Hold both yarns together throughout.
Cast on 12 stitches.
Knit every row.
Cast off.

I find that adding the worsted weight yarn of a matching color adds a lot of needed body so that this scarf is not only decorative, but also warm. I have never met a giftee who wasn't thrilled with one of these fluffy crazy scarves.

DISNEY WORLD

Yes we are! We are leaving! We are going to Disney World! TODAY!

What does this mean for my project? Nothing at all. Yes, I will still be knitting and crocheting on a daily basis because I've got hours at the airport and on the plane and late in the evenings before beddie bye during which I may continue to be productive. Yes, there will still be a daily scarf right on time because I've planned ahead for it.

All it really means is that I won't be able to read comments until I return on the 27th, but I do hope that there will be comments to read!

Until then, if you're on twitter, I'll still be letting my stream of thought flow, but I'll only be able to read direct messages, so if you really want my attention, that's how you can find me.

Thursday, January 20, 2011

Day 20 and Broomstick Lace


Broomstick lace. I needn't say more. An unusual technique and it can be a bit cumbersome at first for crocheters since you have to hold a big fat needle in the opposite hand when you're used to holding only yarn. Lot's of tutorials are available online for the basic technique. Something I do differently is add a row of single crochet between each row of broomsticking. You'll notice a ridge form when you pull up loops for the broomstick portion. Doing a row of single crochet makes the ridge trade sides and you'll have a completely reversible pattern.

1 skein Caron Simply soft
Size H hook
Size 35 knitting needle (the big plastic kind)

Ch 25, SC into second chain from hook and all chains across (24 stitches made)
Row 1: Pull up loops working from left to right and place them on the needle.
Row 2: Hold 4 loops together and sc 4 times in each set of loops across work (6 sets of loops with 4 sc in each loop)
Row 3: Sc in each stitch across work.

Repeat these 3 rows until you're happy with the length or you run out of yarn, whichever comes first. :)

Wednesday, January 19, 2011

Day 19 and the Camoflage Blankie

Remember Day 3 and the No Fuss Fleece? Maybe you want just a little tiny bit of fuss after all. One of the most basic stitches that every knitter, crocheter, crafter, but NON-sewist needs to know is the blanket stitch. It's a terrific stitch for finishing edges that don't need a finish for the purposes of stability.

Cut your fleece to the size and shape that you want it. You'll need a sharp needle. Avoid using any yarn that is thicker than fingering. The fleece is often too tightly knit for a worsted weight yarn and you'll find this to be more of a chore than you were expecting. You should also avoid using a piece of yarn that is too long. It's better to have more ends to weave in than to have a ragged looking yarn that has been pulled through too many times or a wicked tangle.

There are lots of decent tutorials on youtube since my wordy description would probably be useless for this.

Tuesday, January 18, 2011

Day 18 and the Button Baby


Sometimes you have a fun yarn that's very lonely! How far can one ball really get you? We've already had a couple cowls and they're great when you have very little yardage, but let's say you don't want to toss something over the top of your head. You still have options and here's one of them.

Sadly, this yarn has been missing its ball band since before I received it. My guess is it is an acrylic/mohair mix and probably has around 150 yards.

150 yards chunky weight (around 2 sts/in)
Size 15 needles
1 large button
Tapestry needle
Matching thinner yarn for sewing on the button
Depending on the button you may need a second smaller needle as well

Cast on 25
Row 1: Knit into the front and back of first st, K across to last 2 sts, K2tog
Row 2: K across

Repeat this pattern until you have 26 rows.
Complete Row 1.
Substitute row 2 with the buttonhole row as follows: K 11, K2tog, YO, K to end. You will still have 25 sts in the row.

Return to the pattern for another 52 rows. Place a removable marker in the center of the most recently completed row.
Return to pattern for another 26 rows. Bind off.

Altogether you have knit a diagonal garter stitch pattern for 104 rows with a buttonhole and a marker for button placement set equally from the scarf ends. Sew on your button. As you can tell by the picture, a button can mean many things. In my case, I made a piece of i-cord about 9 inches long, tied it in a bow, and sewed through it to make it permanent and used it just as you would use a button by pulling it through the hole.

Wear this scarf by simply wrapping it around your neck and buttoning in the front. Enjoy!

Monday, January 17, 2011

Day 17 and the Checkered Mock Mobius


We all know what a mobius is presumably. In geometrical mathematics (oo, fancy!) it's a plane with only one side. In elementary school this was usually demonstrated by taking a strip of paper, twisting one side, taping it together, and drawing a line until you came to an end. The thing is, you never did come to an end! It just kept going around and around and somehow both sides of the paper had a line on it!

If we can do it with paper, we can do it with fabric. This is a mock mobius because it's not made continuously. It's absolutely possible to knit a mobius without a seam and we'll get to that a little later.


Size 13 needles
2 balls (200 g) Rowan Chunky Print (discontinued, but you can still find lots of it for trade or sell on ravelry)
tapestry needle

Gauge is not essential for this item. Aim for around 2.5 sts/in
Cast on 30 sts (provisional or backwards loop will hide the seam best)
Rows1-6: K5, P5
Rows7-12:P5, K5

Repeat these rows until you're happy with the length or until you've run out of yarn. End on row 11 as row 12 will be formed by grafting the end of the scarf to the beginning. Before beginning your graft, lay your knitting out flat, take one side and flip it, then bring both sides to the center. I find this the easiest way to get the twist correct without having to second guess.

Happily, the checkered pattern is precisely the same on both sides and if you've grafted carefully you'll have no idea where the seam is once it's been blocked. Speaking of which, blocking is tricky for a mobius. I think the spray method works best and I position the twist at the front and tuck a couple of clean hand cloths under each raised area so that a crease doesn't form. Steaming also works well, but be careful not to overdo it or you may find your resulting cowl rather limp.

Sunday, January 16, 2011

Day 16 and the Snug Cable Cowl

I have a new favorite and it's this cowl. I feel it was one of those projects where the yarn and the style and the stitch pattern all came together in happy happy harmony with no effort whatsoever!

This is a snug cowl, and it's definitely my style. Stretchy and squishy and a very very fast knit. You do need to have experience grafting to make a nice tidy seam, so keep that in mind. If you've never grafted before, take some time to practice a bit before you take this one on. Big stitches require a very keen sense of grafting tension. Also if you don't know the provisional cast on (the crochet chain cast on) I recommend Lucy Neatby's Knitting Gems 1 DVD for an excellent tutorial.

Snug Cable Cowl.
1 ball Red Heart Soft less than 5 oz used.
size 13 needles
One extra needle for cabling
Crochet hook and scrap yarn for provisional cast on
Tapestry needle

Gauge is not important for this pattern
Abbrev:
Seed 5: K1, P1, K1, P1, K1
Cbl6f: Place 3 stitches on extra needle and hold needle to the front. Knit 3 stitches. Place held stitches back on left needle and knit 3.

Cast on 28 sts using scrap yarn and crochet hook.
Row 1: K across
Row 2, 4, 8: Seed 5, P2, K6, P2, K6 P2, Seed 5
Row 3, 5, 7, 9: Seed 5, K2, P6, K2, P6, K2, Seed 5
Row 6: Seed 5, P2, Cbl6f, P2, Cbl6f, P2, Seed 5
Repeat Rows 2-9 to desired length (12-14 repeats depending on how snug you'd like it)
Remove provisional stitches and graft beginning stitches to end stitches. They will not match perfectly, but such is the nature of knitting.
Sew in ends.

Saturday, January 15, 2011

Day 15 and the Stockinette Cowl


This is a very speedy knit that you could make for a gift in one evening if you're a fast knitter and 2 if you're slow. Either way, you'll have it finished before the giftee's birthday.

6 oz fingering weight yarn or double knit held double
Size 13 circular needle (16 inches or smaller)
Tapestry needle.

CO 100 stitches. Join into a circle.
Knit every round for 20-25 rounds or until you're happy with the width.
Cast off and darn in the ends.

Keep in mind that a plain stockinette will roll quite a lot at both ends. If you use an acrylic, there will be nothing you can do. If you use a cotton or wool, you'll be able to block it out if you desire. Choose your yarn carefully based on the look you'd prefer. As for me, I usually prefer a cowl that's more snug, so you'll be seeing a few more as I practice making my own perfect cowl.

Friday, January 14, 2011

Day 14 and the Caterpillar


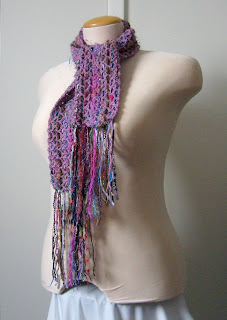
Odd name, but taken directly from Stitchionary 5 and it is the title of the particular stitch pattern. A quick lace panel with some garter or seed stitch on either end makes a quick ornamental scarf. It might keep you warm in early spring, but a skinny scarf like this is really all for fashion!

Recipe:
Choose a smooth yarn for the best stitch definition and a needle size to match.
Choose a lace panel from your favorite stitch dictionary.
Cast on the recommended number of stitches PLUS 6.
Follow the pattern with the first and last 3 stitches always knitted.

Thursday, January 13, 2011

Day 13 and Snowflakes

I had a different scarf planned for today, but when Kevin commented that it looked like a bunch of snowflakes, I had to use it right away to honor the first big snowstorm of the year here in Northeast Ohio!

Here is a scarf based on a stitch in Stitchionary 4: Crochet. The name of the stitch is "shell and bobble" although I don't really see the bobble and I did make a couple minor changes.

Head over to your crafting library (or your local library if you don't already own this book) and turn to page 138.

Changes to the pattern:
-Rows 1 and 3 were completely ignored. I didn't feel I needed the extra height or the need to even out the chained areas.
- Instead of working rows, I worked in the round. This did not change the pattern at all and it still looks nice even on the underside.
- I had to write my own corner area and it is as follows.

The chain at the end of what is called row 2 (chains and dcs) shall be treated as an extra stitch.
--At the turning point of row 4 work an additional 3 (ch1, tr 1) into the extra stitch, then ch 1 and continue to the other side. At the end of row 4 do the same thing and slip st into the 4th turning chain from the beginning of the row.
--At the turning point of row 5, continue the pattern using the center extra tr as the anchor point and working 5 dtr instead of 4. At the end of the row, do the same thing and slip st into the first sc.
--At the turning point of row 6, continue the pattern with 4 clusters instead of 3. At the end of row 6 do the same thing and slip into the first sc.

Keep your chains a little bit looser for all the turning areas and good luck! Feel free to contact me via twitter ( http://twitter.com/nerdytogether ) or email ( nerdytogether@yahoo.com ) if you need help with this pattern adjustment.

Wednesday, January 12, 2011

Day 12 and Wide Ribs


I. love. ribbed scarves. First you saw the 1x1 rib, yesterday was mistake rib which is a type of 2x2 rib and today you see a classic 3x3 rib. And truly any number by any number will make a darned handsome ribbed scarf.

For this exact scarf:
1 pound worsted weight yarn
size 15 needles
tapestry needle for ends
Yarn is held double throughout.

CO 30 (or any number divisible by 6)
Every row: K3, P3 across until you're happy with the length.
Cast off in 3x3 ribbing and sew in your ends. EASY!

Giant needles like this make this a speedy knit, and because the stitches are so large, this is a prime scarf for adding buttons. You don't need any button holes, just fit the buttons through the stitches wherever you feel it looks nice that particular day.

Are you burnt out on ribbing yet? I'm NOT but tomorrow I'll change it up anyway.

Tuesday, January 11, 2011

Day 11 and the Mistake Rib


I can't speak for your stash, but I am always receiving hand-me-down yarn from someone's aunt who passed away, someone who thought they'd try knitting or crochet and didn't enjoy it (god forbid) or someone who "saw this at the thrift store and thought of" me. I certainly do appreciate the gestures! Unfortunately, as often as not, there is a lot of unpleasant yarn in the batch. You know what I'm talking about. Orlon from the 70's. Squeaky acrylic that has been frogged many times over and is already pilling. I know you know.

Previously in ribbing, the knits and purls all lined up. In mistake rib, you have a 2x2 ribbing which doesn't line up properly. Every other stitch will be lined up and on either side of that stitch there will be a seeded column. It's a very easy stitch to knit as well as to read, but it creates such a dense stretchy and squishy scarf that it's the perfect stitch to use up some of your less desirable yarn and still have a pleasant wearable item.

On the other hand, if all your yarn is lovely, then your scarf will be divine rather than just wearable and you have my jealously.

Choose a needle at least 1 or 2 sizes larger than the ball band recommends.
Cast on a multiple of 4 stitches plus 3 more.

Mistake Rib (aka Mock Brioche)
Every row: *K2, P2* repeat to the last 3 sts. K2, P1
Cast off row: K 1, *P2tog, Bind off the previous stitch, K2tog, Bind off the previous stitch* repeat to the end.

This is unusual for a cast off row, but it's absolutely necessary to decrease your stitches by half or your scarf will flare terribly at the cast off edge. This does make that end less elastic, but since the beauty of this scarf is the deeply ribbed texture, you won't have need to stretch that end out very often anyway.

Monday, January 10, 2011

Teasing Uncle Scrooge

I can't believe there are only ten days left until our trip to DisneyWorld! So I'd better stop putting off an idea for a related blog post that I've been meaning to write for a long time.

One of the key elements of any visit to any of the Disney parks is the character encounter. Whether it's a person in a full-on animal costume or a woman simply dressed up as a princess, they always add a lot of fun to the atmosphere and experience. And it seems that most people who take the time to track them down, or wait in line to see them, or just happen to bump into one, enjoy the opportunity to have a photo taken with them. And usually it's a visitor-standing-next-to-character-while-grinning photograph. I don't want to say there's anything wrong with that, or that it's too boring, but it seems to me that if you take the time and money to visit the Disney universe, you might as well go an extra step to create extra-special photographed memories.

My idea is to create an amusing shot for any character encounter we happen to make during our DisneyWorld visit. And the purpose of my posting about it now instead of just showing you afterward is that I would like to hear any of your suggestions for poses or set-ups that you think we should try. I'll list a few examples that I had in mind, in case I'm still not clear on what I'm going for:

-Holding a dollar bill just out of Uncle Scrooge's reach
-Sharing a baguette with Aladdin and/or Abu
-Going face-to-face against Donald Duck by doing that swinging-one-fist-and-hopping-on-one-foot thing
-Standing normally but facing away from the camera, with Goofy
-Pin-the-tail-on-Eeyore

I could probably go on and on, but let's any suggestions you may have!

Day 10 and the Ribbed Wonder


Knitted 1 x 1 ribbing is a fabulous stitch for scarves! Not only is it completely reversible, but because the stitches stack themselves in the front and back of the fabric, it's very thick. I find this most comfortable, drape-y, and squishy if I use a needle that is 3 sizes too large for the yarn.

For this exact scarf, I used reclaimed cotton. It was about 6 wraps per inch and knitted on size 13 needles. 24 stitches made me happy. What will make you a happy scarf?

Sunday, January 9, 2011

Day 9 and the Filet Weave

Edit: Just put in a much better photo! It's hard keeping up to quota!

Filet crochet. Just a grid, but use a whole bunch of scraps to weave back and forth through that grid and you've got something special! Maybe instead I should have called this the glam boho rock scarf.

Pick a smooth yarn and a hook that matches. You'll recognize this basic 1 chain filet pattern right away. Light worsted and a G hook or worsted and an H hook both will give good results.
Chain 24.
row 1: Dc into 5th chain from hook. *ch 1, skip 1 ch, dc into next ch* to the end of the row. Turn.
row 2: Ch 4, *Dc into next dc, ch 1* repeat to the end of the row. Turn.
Repeat row 2 until your scarf is the desired length.

Now grab a tapestry needle and all of the crazy novelty yarn scraps you can lay your hands on. It doesn't matter if they match or not. Absolutely any combination will end up looking great in the end. I'm not exaggerating here. ANY yarn with ANY other yarn. I ended up using 18 different yarns for this project. No two are the same. Best of all you only need a scrap as long as your scarf. 6 feet, 8 feet, 10 feet. Scraps that you might not otherwise be able to use, but were too much of a hoarder like me to get rid of will have a home.

Start weaving the long way. Use as many yarns as you like. I find that if you hold 3 or 4 yarns together, you get a nice full fringe and your grid doesn't look too empty.

Finishing is a 3 step process.
1) Knot your fringe together. If I patterned this right, you should have ten squares in your grid so each fringe will have a pair with which to be knotted.
2) Trim your fringe. Do it sloppily if you like. I think all the different yarns look best when they aren't perfectly straight across.
3) Knot again. This time you'll be taking the very tip of each yarn and tying an overhand knot to prevent fraying. If you used all smooth yarns, you might be able to skip this step. If you used novelty yarns, especially lots of boucles or eyelash or yarns with a metallic bit would around the outside, you'll need to prevent those guys from unraveling.

I'll definitely be making more of these. I love this look!

Saturday, January 8, 2011

Day 8 and the Long Tall Granny


I'm not usually much for the granny square, but one very long granny square is a divine scarf!

If you're a crocheter you surely know the granny stitch. I'll just explain the first row and first round and let you work the rest of the way.

Chain a very very long chain. Don't bother counting, just go until it's as long as you want your scarf.
Row 1: Dc into 6th chain from hook. Dc in next 2 chains. *Ch 2, Skip 2 ch, Dc in next 3 chains* Repeat to the end of the chain. End with ch 4, slip stitch in next chain. (If you have extra chains that didn't fit the pattern, just pick them out at this point.)

Row/Rnd 2: Slip stitch in the underside of each of the next 3 Chains. Ch 3 (counts as first Dc), Dc twice more into chain space. Make a granny cluster into each chain space and 3 clusters into each end chain space. Be sure to chain 3 at the corners to keep your scarf square.

Change colors as you see fit. Continue making rounds until you are happy with the look. I always do a row of single crochet around the edge for a tidy finish.

Friday, January 7, 2011

Day 7 and the Big Fat Seeds


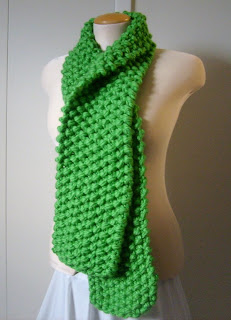
Biggest yarn ever knitted in seed stitch. I used Lion Brand Big, but I don't think it's being made any more. Aim for 2 stitches to the inch to get the same look. I'm betting Wool Ease Thick n Quick and Wool Ease Worsted held together would come pretty close.

The trick here is sewing in the ends. I had to split a lot of yarns before I felt comfortable that it wouldn't work it's way back out.

For new knitters, seed stitch is just alternating knits and purls on every row. The first row is k1, p1 across. On all following rows, knit the purls and purl the knits.

Thursday, January 6, 2011

Day 6 and the Jersey Cowl


Thank goodness for recycling! My t-shirt that is in perfectly good shape except for the stain way up by the collar can still be put to good use!

Find yourself a t-shirt that you no longer would wear the normal way and which is of the seamless variety. (if you don't mind the seams, well that's fine too) If you have a rotary cutter, this would be a great time to use it, but if you don't just do your best to make nice neat cuts. Cut off the bottom hem and cut off the top of the shirt just below the arm holes. Give it a slight stretch and hang that bad boy 'round your neck. Double it if you wish, you're bound to have plenty of stretch and extra fabric!

Wednesday, January 5, 2011

Day 5 and The Screen Door


Did you ever wonder how Grandma's crocheted afghan with all the many many holes in it still managed to keep you warm? WELL! All those holes are filled with air and all that air is being held near your body. Your body makes those little pockets of air warm, so really your own body heat is keeping you warm! Isn't that interesting?

This scarf is nothing but holes. Holes in a frame. Like a screen door!

1 ball Caron Simply Soft
Size H crochet hook
Tapestry needle

Chain 31.
Row 1: Dc in 7th chain from hook. Ch 2, Dc in 3rd Chain to the end of the row.
Row 2: Ch 5, turn. Dc in next Dc. *Ch 2, Dc in next Dc to the end of the row.* Ch 2, Dc in 3rd ch. Repeat Row 2 until you have the length you want.
Do 2 rows of Sc all the way around the edge of the grid (3 sts in corner stitches) for a tidy finish.
Sew in loose ends.

I have found that I chain very loosely. I recommended a chain 5 here since that is the standard for a double crochet filet pattern (I'm sure you recognized it immediately). I have found that personally, I must only chain 4 to get the proper spacing. You know your own crochet best, so by all means, make adjustment if you need to!

Tuesday, January 4, 2011

Day 4 and the Uncut Braided Fleece

Have you ever been to Disney World, Cedar Point, Busch Gardens or anywhere that small personalized leather name bracelets make for popular souvenirs? You may also have attended a summer camp where one of the arts and crafts was such a bracelet or a keychain!

Here is that exact technique in scarf form. The layered fabrics make this a warm scarf and the fact that the layers are not attached to each other allow it to drape naturally and comfortably.

Follow these steps and use some trial and error of your own.

First, cut your fleece at least twice as wide as you want the scarf and about 40% longer than you want the scarf. Feel free to eyeball this. The measurements make very little difference as the technique will be the same no matter what.

Next, leave about 3 to 5 inches of fleece at either end uncut and cut the center section into 3 equally wide strips.

Now, make 3 passes of a traditional 3 strand braid. 1) right over center 2) left over center 3) right over center. Then take the bottom left corner and keeping it flat, rotate it clock-wise below the center strip and above the other two. The corner will pass through the strips and the braid will still look twisted at this point. I suggest putting a safety pin in the uncut area at the bottom to mark the right side. The right side should always be face up!

Make 3 more passes of the braid. 1) left over center 2) right over center 3)left over center. This time take the bottom right corner and rotate it back through the strips counter clock-wise. Once again, the corner will pass through the strips below the center and above the other two. This time the rotation will straighten the strips back out.

Repeat the last 2 steps until your braid is as tight as you like and you have no more strip length with which to braid. Go back the the top and gently tighten and tidy the braid. You may find there is room for one more pass.

Pinning down the very top of the scarf will help you work as the top end should remain stationary the entire time.

You can find videos by others on youtube using the search term "mystery braid" and "trick braid" as well as "leather braid" as this is such a common leather technique. Someday when I get myself a good video camera, I'll post one as well using my rotation method.

Monday, January 3, 2011

Day 3 and the No Fuss Fleece Muffler


Absolutely the easiest thing you could possibly do. No prior skills necessary at all. You'll need a pair of scissors and 2 yards of fleece. Cut the fleece the long way to the width you'd like your scarf and you're DONE. You'll have enough fleece leftover for 2 or 3 more scarves depending on width. You can even cut slices in the two ends to make a fringe.

This would be an excellent project for an inexpensive group photo prop. Make one for every person in your family or class or wedding party and you've created coordination in no time flat.

With so many different colors and patterns of no-ravel fleece available, the hardest part of this project is picking out your fleece. Do try to use a fleece without a wrong side, since scarves are seen on both sides.

Sunday, January 2, 2011

Day 2 and the Sideways Single Crochet


Here we have a fantastic way to use up all your yarn scraps. As little as 15 yards can be used for a single row. Small bits that might not otherwise be used at all could be a lovely accent color among the other stripes.

Total yardage between 200-300 yds
Worsted weight, aran weight, and light worsted can all be used effectively
Size J crochet hook (or the size appropriate for the thickest yarn you plan on using)

Chain 201.
First row: Single crochet in second chain of hook and each chain across. Cut yarn as long as you would like the fringe and pull through the final loop.
Second and all following rows: Choose a new yarn, leave a tail for the fringe. Create a slip knot and place it on your hook. Single crochet in every stitch. Cut yarn and pull through final loop for fringe.
Continue until the scarf is as wide as you would prefer.

You may find your fringe is not as full as you would like. Use your crochet hook and looped bits of extra yarn to fill it out. Match your colors or use even more mismatched bits.

This particular scarf is on the stiff side as single crochet tends to be. Depending on your choice of fibers, blocking or washing your scarf can help ease some drape into it.

Saturday, January 1, 2011

Day 1 and The Basic Garter Stitch


It seems fitting that the first scarf is a technique in which I consider myself fluent. This knitted scarf is made in the most basic garter stitch. Following is the exact pattern with some suggested changes.

215 yds Aquarius brushed chunky-- This yarn is as far as I can tell no longer on the market. A nearly identical substitute would be Lion Brand Jiffy
Size 11 needle (8 mm)
Yarn needle
Optional Crochet hook for fringe
Gauge is not important for this scarf

Cast on 20 sts. Knit every row until desired length or you run out of yarn!
Alternately, cast on as many stitches as needed for the width you'd prefer.

You may notice that I chose to use a needle that was 2 sizes larger than recommended for this yarn. This is because I have always felt that garter stitch is a rather tight fabric and doesn't give very much drape. I prefer to have my scarf hang nicely around my neck and shoulders and using a larger needle is one way to achieve that.

Now, I know I'm not challenging myself with this one, but come on now! It's my first day! I've got to ease myself into it! Fear not; as the year wears on, you'll find the scarves to vary a great deal.

365 Scarf Project

2011 marks the start of a new year, and in my case a new project! I'm calling it

The 365 Scarf Project

Mission: To create 365 different scarves over the course of the year and share one scarf daily via this blog. To sometimes provide tutorials as well so others might create scarves of their own.

Vision: To snuff out the dreaded "crafter's block" in myself and anyone who wishes to follow the project. To nurture a sense of pride in one-of-a-kind handmade goods. To expand my own sense of fashion, art, and unconventional thinking. To encourage individuality.

Why?

One might ask what drives me to set such a lofty goal. I might go completely gray-haired before I could think of an answer that made even a lick of sense. I guess the most straight-forward answer is this: Because I think I can do it.

It's going to take more dedication than I've ever put into a project. It's going to take more inspiration than I've ever intentionally had to search out. It could possibly consume every waking moment that I don't spend at my place of employment.

Still, I think I can do it. Oh sure, I might have to start a scarf for March and October this very moment, and I might have to have ten projects going at any one time. I might have some daily posts in which I'll be forced to show some *gasp* mediocre work. I might have to buy a pattern now and then. These are risks I'm willing to take!

Necessary Information

In each daily post I intend to include the following.

A photo: I will pray and pray and pray that my camera holds out. I will pray and pray and pray for bright sunny days for best picture opportunities. I will post a photo even if I can't get a good one! There's always the camera phone as a last resort!

A title: Every scarf deserves a title. A generic title is still a title, but I will put forth every effort to at least use an adjective. It might be only a stitch pattern. I say that's acceptable!

A method of construction: I will categorize every scarf into one of the four main categories of knitting, crocheting, sewing, or crafting. Since it is my vision that followers will be able to make scarves of their own, I will provide enough information such that a similar pattern or design can be hunted down or self-designed. Sometimes I will provide a full pattern (learning about proper pattern making along the way!)

Support and Inspiration

Let's face it, folks. There is a LOT of room for failure in this project. I realize it and I am ready to face it, but if I can get a hand now and then, I will be ever so grateful! Please, offer your support in the comments of this blog. Send me links to images and designers that inspire you and might inspire me via twitter ( http://twitter.com/nerdytogether ) Send me photos when you decide to make one of the daily projects. It gives me inspiration just knowing that someone is enjoying the creativity along with me.