Monday, January 31, 2011

Day 31 and the Shortstop


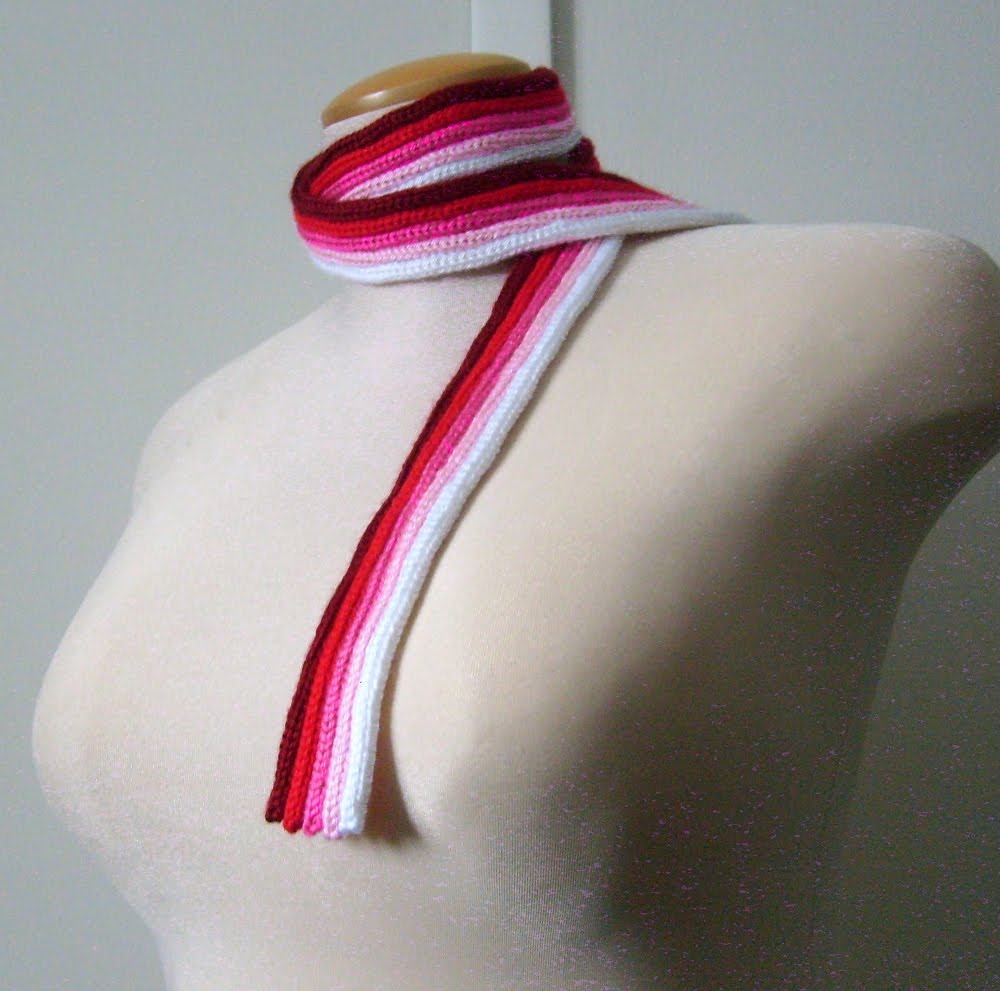
I call it this because I literally stopped short. This could have easily been a normal scarf that hangs around your neck in the normal way, but because I stopped short, I needed a way to keep this itty bitty length from constantly falling off the neck. The result was a style of keyhole scarf. By folding over the one end and sewing or darning it into place, the end piece is a nice tube of fabric through which the rest of the scarf can be threaded so that it holds onto itself. It even has more functionality for an acrylic since the sewn stitches also prevent some curling.

This was a pattern taken from Stitchionary: Lace so be sure to check that book out if you don't already own it. I added a border because this scarf is made from acrylic and there's no way to block it.
Border:
Right side: Sl 1 Kwise, K2, P2 (pattern) P2, K3
Wrong side: Sl 1 Kwise, K4 (pattern) K5

Finally I did my best to graft it cleanly to the other side. This was tricky because you are grafting front to back , but if you go slowly and follow the movement of the yarn, it can result in a very clean connection.

January's Giveaway Winner!

For this giveaway I typed in each name as many times as each person had entries and clicked create list only once. Below is the result:

Congratulations to Sinead!

You now get to choose from 31 January scarves!

Everyone who participated, THANK YOU!!
Once our winner has chosen a scarf, many of the other completed scarves will be available for a limited time in my etsy shop, NerdyTogether. And perhaps I'll do this again sometime! Time will tell :)

Sunday, January 30, 2011

Day 30 and the College Try


Here is another very very easy crochet scarf. I used a size j hook and a double strand of Simply Soft. Chain as many stitches as you want plus 3 to get the height of the stitch and just do a nice easy double crochet for as long as you'd like. I used a second color and added stripes and switched colors halfway as well.

I suggest using team colors for your college kid to wear with pride. I also suggest picking out colors and making a few of these to match your favorite coats, hats, or gloves. It's just so classic!

Saturday, January 29, 2011

Day 29 and the Reversible Cable

Edit: Ta-Dah!
A picture is coming when the sun gets a little higher

I decided I have far too many feminine scarves and nothing says masculine than a nice neutral colored cable scarf. I'm also a bit fanatical about scarves being pretty on both sides. I can handle it if they aren't but I'm infinitely more happy when they are 100% reversible. Happily, reversible cables are no harder than normal cables and here is one of the most basic types.

In this project I have also found one of my new favorite yarns. This is quite possibly the softest acrylic I have ever felt. I can't even describe it. It feels like baby powder when you rub it on your skin. Loops and Threads Charisma. The brand is actually the house brand of Michael's Craft Stores, and I couldn't be more impressed with the line so far. I hope it stays that way.

Now the basic idea of this type of cable is to work the cabling in 1x1 ribbing and not to block the ribbing out too much. This way it mimics stockinette on both sides. It's important to have a reversible edging or no edging at all to continue the reversibility. Here I've used a seed stitch.

3 balls Charisma
size 13 needles
Extra needle for cabling
Tapestry needle

Gauge is not particularly important here. Aim for about 3 sts/in

Abbrev.
Seed 5: K1, P1, K1, P1
Rib 12: *K1, P1* 6 times
CblRib: Place 6 sts on extra needle and hold in front. From left needle *K1, P1* 3 times. Working off cable needle *K1, P1* 3 times.

Cast on 22 sts.
Rows 1-6: Seed 5, Rib 12, Seed 5
Row 7: Seed 5, CblRib, Seed 5
Row 8-12: Seed 5, Rib 12, Seed 5

Repeat until your scarf is the desired length or until no yarn remains.
Cast off row: Cast off 5 in the normal way. *K2tog, bind off 1* 6 times. Bind off 5 in the normal way. This helps eliminate some of the extra width that is usually forced in with a normal bind off on a normal ribbing. It's not as elastic, but it matches the cast on row better. If you are adept at the sewn ribbing cast off, that would be a perfect substitute.

Tips on working this pattern and technique:
--Use some sort of marker to denote the right side. Because this scarf is completely reversible it can be difficult to tell which side you are on. I like to use the long tail cast on and leave the tail dangling. When the tail is on my right I know I'm on the right side.
--When counting your rows, use the seed stitch as a guide. Place removable markers on the row ends if it helps you keep track of where you are in the pattern.
--Avoid substituting yarns that don't have a lot of stretch such as cotton or bamboo. This cable can certainly be done in those yarns, but a resilient bouncy yarn will have a more even and more handsome result.

If any dear readers who are adept at this technique have tips to add, please let me know in the comments. I'll be happy to edit and give credit for your clever ideas. :)

Friday, January 28, 2011

Day 28 and the Cord Stack


There's an ingenious little device called the Embellish Knit! which is a cranking i-cord maker. If I wanted to make i-cord by hand, I could certainly do it, but for very long lengths it can become mentally exhausting to do something so mindless.

Here I have made lengths of i-cord as long as I wanted my scarf and laying them side by side, sewed straight through all of them in many different places such that the end product was, WOW, a scarf! This would be a terrific project for kids to do since there is no prior skill necessary and using the little machine is very very easy.

I used caron simply soft for all of the cords and this resulted in a thick but soft cord. I did find that the weight that came with the machine needed to be just a little bit heavier for this particular yarn, so I put the weight inside a small tin that I happened to have and added a few other small heavy items like marbles to it. The lip of the tin then held the yarn and I could use the machine in the normal way.

Use extra yarn and a tapestry needle to just sew straight across the grain. I hid my ends, but if you were to let them hang and add fringe on both sides, you would have a completely different and very fun look as well.

Thursday, January 27, 2011

Day 27 and the Keyhole Stripper


Shocking! Not really. In the last few posts I took repurposed fabric and used it as you would any normal fabric. This time I have taken the fabric and turned it into yarn.

This scarf is made of t-shirts which have been cut into inch wide strips and knitted. It does require a bit of extra work since you have to make the yarn as well as knit with it, but because the stitches are so large and a single yard covers a great amount of real estate, you'll be happy to know it won't take nearly as long as you might be guessing right now.

This particular scarf required the lower half of 3 t-shirts. The upper half of the shirts (the part with a neck and armholes) are mere scrap to be reused some other way. Each scrap was cut into inch long strips across the body so that long loops were formed. The loops were snipped so they were just lengths and the ends were knotted together. I used a square knot, but if you know many knots and another would be more attractive, go for it.

I didn't use a pattern and I didn't keep track of my method since this is one of those untidy and meant to be sort of styles. I do know that I cast on 9 stitches using a 35 needle and when it came time for the keyhole, I used knots to tie on the next strand and knots to tie off the ends as well. I did this mostly in Stockinette, but added a garter row here and there to help with some of the curling.

Wednesday, January 26, 2011

Day 26 and the Tidy Scrapper


Maybe insanity isn't for you. I had a couple old sweatshirts that haven't been getting any love in a long long time. They deserve a second chance as a nice scarf. Just like the Scrapper scarf, you can use bits and pieces from any shirts that you happen to have, but this time you will actually be cutting them into nice neat rectangles just like the Double Faced Flannel.

The length of the rectangles doesn't matter as long as the width remains the same. That width should be twice as wide as you want the finished scarf. Cut as many as you need in as many lengths as you please and as many colors as you have. If you have characters or words on some of your scraps, take care to align the images so that when the scarf is worn, the images are right side up. The bottom edge of the image should be closer to an end of the scarf rather than the middle.

Line up the matching widths of the pieces with the right sides facing each other. Sew a seam (anything from a cm to an inch. Whatever you're comfortable with). Open the fold and align another piece of fabric and seam. Keep going until you've used all your pieces.

Now, fold the very long piece of fabric in half long-wise (hot dog style) and line up the long edges. Sew the entire length and turn the item inside out. I used sweatshirts, so ironing wasn't going to do much, but if your fabric is cotton or linen, you might want to give it a light press at this point to tidy up the seam.

Just as you did for the double faced fleece, you'll need to clip the corners, turn in the edges and sew them shut. If you use sweatshirt, you'll want to leave about a centimeter unsewn on each edge. Most home machines just can't feed such a thick fabric and you'll get a nicer seam by stopping short at both ends.